
oldrockfan
Well-Known Member
So I have a Gibson LP special faded that I picked up years ago at a really low price. I had planned to do something with it but just never got around to it. Well, I have some free time this week so I decided to break down and re-finish it. I am going to go with the same white finish that I used years ago on a guitar since I have all the stuff to do that color (or I thought I did but more on that in a sec). I have about 8 hours in the project so far.
Guitar is partially stripped of its stuff (I leave the pups and electronics wired up and just tape them up). Before I got started, I had to do something with the crusty frets that were all rusty and not finished out very well from the factory. I used Stewmac fret files and 1200grit sandpaper to smooth and polish up the frets.

Then after I finished up with the frets, I finished up taping the guitar so it was ready for some sanding.

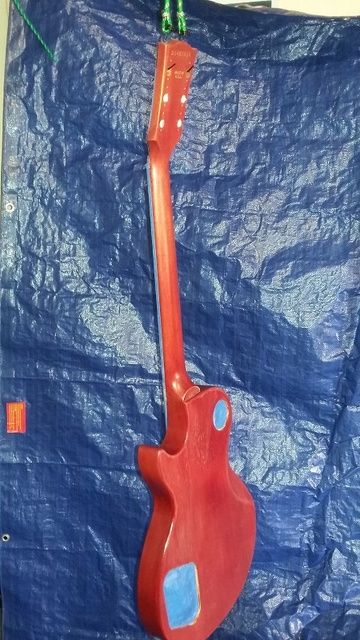
Now the sanding part. I didn't sand down to bare wood... just smoothed things out with 320grit. There were still plenty of open pores as Gibson didn't do much of anything to prep this guitar before they sprayed it. The sealer/primer and coats should fill in the open pores later (hopefully). Here is a pic of the guitar before primer in the redneck spray booth :)
Ok next step was to lay down the sealer and primer. I had some old primer left from my re-finish years ago and tried to use it but clearly it had gone bad. I tried shooting it on the guitar and it was terrible. Clumps and runs and I was so unhappy with it that after that first coat... I sanded it off and started over with fresh sealer/primer this time and shot 2 light coats. No pictures of the primer... I was kinda pissed at myself for being lazy and trying to use the old stuff (should have known better) so I just sanded it off and reshot it with new primer.
I let that cure up for a couple hours and followed up with some 400grit sanding to knock off the high spots. Nothing formal to go by... I just sand till the surface has a uniform feel to it. Hard to describe but when you run your hand across the guitar... any rough spots stand out and I hit them with the sandpaper till entire guitar feels the same... kinda like satin finish. Gotta be careful when sanding those edges. The trick I use it to only sand edges with old sandpaper. It is not as aggressive so much less likely to cut thru the finish to bare wood. Once finished with the sanding... there is still some mahogany grain showing thru... I don't want my primer coat to be too thick trying to fill all the grain in the mahogany. I would guess maybe 15-20% of the surface still shows some pores or grain but they are not too deep so should cover up during the lacquer phase.
Ok so after the sanding... I use high pressure air to blow off all the dust and then follow that up with some cheese cloth that I use when painting hotrods. Dust is the enemy when it comes to shooting the lacquer so making sure it is dust free just makes life easier.
Ok so next step is to shoot the lacquer on the guitar. For this, I use a 50/50 mix of lacquer and lacquer thinner with the stewmac dye added to make the color. I am not shooting any formal formula for white... just using the exact same thing I did last time which was white with just a touch of blue.
Now time to start shooting the finish!!! The way I do it is to start off with a light coat over the entire guitar and let that dry 15mins. Then I follow with a wet coat of lacquer and let it dry for a couple hours.
Next step was inspecting the first 2 coats for any runs and good news was no runs... so far, so good! I followed up with two more wet coats of lacquer again with 15mins dry time between coats. So my progress so far is 2 sealer/primer coats and then 4 coats of white lacquer. I just went out to inspect it and no runs so everything seems to be dialed in pretty good.
After insepction... I decided the finish is fine on the neck and back so they will be ready for wetsanding and then clearcoat. The front still has a few spots where you can see mahogany grain coming thru the finish. I would estimate maybe 5% and it the grain is all pretty shallow so hoping 2 more coats tomorrow and it will be good. If necessary, I might have to shoot 4 more coats tomorrow. Here is a pic oft he guitar with 2 coats... I didn't get a pic after the 4 coats as sun was going down.

So if weather holds out... I will finish up the lacquer paint coats tomorrow and can let it set up overnight. Then Sunday, I can wetsand it lightly and start shooting clearcoat. I will shoot 4 coats of clear Sunday and hopefully that will be enough. Then it will need a few days to harden up so I can get to the wetsanding and buffing.
Guitar is partially stripped of its stuff (I leave the pups and electronics wired up and just tape them up). Before I got started, I had to do something with the crusty frets that were all rusty and not finished out very well from the factory. I used Stewmac fret files and 1200grit sandpaper to smooth and polish up the frets.
Then after I finished up with the frets, I finished up taping the guitar so it was ready for some sanding.
Now the sanding part. I didn't sand down to bare wood... just smoothed things out with 320grit. There were still plenty of open pores as Gibson didn't do much of anything to prep this guitar before they sprayed it. The sealer/primer and coats should fill in the open pores later (hopefully). Here is a pic of the guitar before primer in the redneck spray booth :)
Ok next step was to lay down the sealer and primer. I had some old primer left from my re-finish years ago and tried to use it but clearly it had gone bad. I tried shooting it on the guitar and it was terrible. Clumps and runs and I was so unhappy with it that after that first coat... I sanded it off and started over with fresh sealer/primer this time and shot 2 light coats. No pictures of the primer... I was kinda pissed at myself for being lazy and trying to use the old stuff (should have known better) so I just sanded it off and reshot it with new primer.
I let that cure up for a couple hours and followed up with some 400grit sanding to knock off the high spots. Nothing formal to go by... I just sand till the surface has a uniform feel to it. Hard to describe but when you run your hand across the guitar... any rough spots stand out and I hit them with the sandpaper till entire guitar feels the same... kinda like satin finish. Gotta be careful when sanding those edges. The trick I use it to only sand edges with old sandpaper. It is not as aggressive so much less likely to cut thru the finish to bare wood. Once finished with the sanding... there is still some mahogany grain showing thru... I don't want my primer coat to be too thick trying to fill all the grain in the mahogany. I would guess maybe 15-20% of the surface still shows some pores or grain but they are not too deep so should cover up during the lacquer phase.
Ok so after the sanding... I use high pressure air to blow off all the dust and then follow that up with some cheese cloth that I use when painting hotrods. Dust is the enemy when it comes to shooting the lacquer so making sure it is dust free just makes life easier.
Ok so next step is to shoot the lacquer on the guitar. For this, I use a 50/50 mix of lacquer and lacquer thinner with the stewmac dye added to make the color. I am not shooting any formal formula for white... just using the exact same thing I did last time which was white with just a touch of blue.
Now time to start shooting the finish!!! The way I do it is to start off with a light coat over the entire guitar and let that dry 15mins. Then I follow with a wet coat of lacquer and let it dry for a couple hours.
Next step was inspecting the first 2 coats for any runs and good news was no runs... so far, so good! I followed up with two more wet coats of lacquer again with 15mins dry time between coats. So my progress so far is 2 sealer/primer coats and then 4 coats of white lacquer. I just went out to inspect it and no runs so everything seems to be dialed in pretty good.
After insepction... I decided the finish is fine on the neck and back so they will be ready for wetsanding and then clearcoat. The front still has a few spots where you can see mahogany grain coming thru the finish. I would estimate maybe 5% and it the grain is all pretty shallow so hoping 2 more coats tomorrow and it will be good. If necessary, I might have to shoot 4 more coats tomorrow. Here is a pic oft he guitar with 2 coats... I didn't get a pic after the 4 coats as sun was going down.
So if weather holds out... I will finish up the lacquer paint coats tomorrow and can let it set up overnight. Then Sunday, I can wetsand it lightly and start shooting clearcoat. I will shoot 4 coats of clear Sunday and hopefully that will be enough. Then it will need a few days to harden up so I can get to the wetsanding and buffing.
Last edited:


 (finish is still very soft) so I stopped that and am going to let the guitar sit for a week or two to let the finish harden on up. Then I should be able to buff out the scratches and finish installing the hardware so I can try it out! I really like the way it looks in white. It looks like a totally different guitar with the gloss white. Edited to add: to give you an idea of just how soft the finish still is... if you look close at the very bottom of the guitar where the strap button would be... see the way the reflection looks distorted? That is from me resting the base of the guitar on my leg while doing some of the hardware installation. The texture of the cloth on my bluejeans transferred into the finish in that spot. One thing about nitro lacquer finishes is that they take a while to fully harden! It would have been smarter for me to just let the guitar sit for a month but I'm too impatient for that
